Results of MAP Student Project (SUMMER 2002)
How to use the Sputtering System
Map Student: Jan Springfield
Project Advisor: Angie Chief
Sputter Coating (Au, AuPd, or Pt)
- Place mount sample (wear gloves) on coater tray and ensure that the sputter source is clean and securely attached in place in the lid. Use the shorter glass jar, making sure that top and bottom rubber surfaces are clean and free of debris. Carefully center glass jar and close lid. Attach argon line (clear tygon tubing line).
- Set desired coating thickness (10nm is typical for a flat or polished sample, 20nm for small particles, and 5-7nm for biological samples).
- Start the pump by pressing the POWER and PROCESS buttons. It helps if you hold the chamber lid down at first until the pressure starts to decrease in the chamber. If the pump makes laboring noises and the pressure does not decrease, stop the pump, realign the jar and lid and start again.
- Wait for the HIGH VOLTAGE and GAS to turn on automatically (when the pressure reaches ~40 mTorr). This should take roughly 5 minutes.
- Backfill the chamber with argon to a pressure of 80 mTorr. This is accomplished by opening the leak valve (labeled “1”) four or five full turns.
- The thickness of the coating is monitored. The coater will automatically shut off and vent the chamber when the set thickness is reached. You can manually shut down the coater anytime by pressing the HIGH VOLTAGE or POWER buttons.
- Close the leak valve; do not over tighten. Remove your sample.
- Make appropriate entry in the SEM logbook.
Carbon Coating
- Load a new set of carbon rods in the evaporator lid. Carefully clean the contacting ends of the rods first with emery paper to ensure good contact.
- Place mount sample (wear gloves) on coater tray. Use the taller glass jar, making sure that top and bottom rubber surfaces are clean and free of debris. Carefully center glass jar and secure the carbon evaporator lid, making sure it is centered on the glass jar. Attach argon line (clear tygon tube).
- Start the pump by pressing the POWER and PROCESS buttons. It helps if you hold the chamber lid down at first until the pressure starts to decrease in the chamber. If the pump makes laboring noises and the pressure does not decrease, stop the pump, realign the jar and lid and start again.
- Wait for the HIGH VOLTAGE and GAS to turn on automatically (when the pressure reaches ~40 mTorr). This should take roughly 5 minutes.
- Backfill the chamber with Ar to a pressure of 100 mTorr. This is accomplished by opening the leak valve (labeled “1”) four or five full turns.
- Turn on the Carbon Evaporation Accessory power. Warm the tip by turning the current up halfway to the first big line (10Amps) for 10 seconds, then back down to 0Amps for 15 seconds. Do this 4-5 times, increasing the current by 1Amp each time. The tip is sufficiently warmed when the whole tip glows orange.
- Slowly increase the current. Somewhere close to 60Amps (do not turn the current above 60A), the current will spontaneously decrease. When this happens, turn the current down two small notches and leave it there. The whole tip should evaporate in less than 30 seconds, during which time you should see small sparks flying off the carbon tip. When done, turn the CURRENT down and the POWER off. The tip breaks (you’ll see a flash), turn down the current and power off; you are ensured a coating.
- Close the leak valve; do not over-tighten. Press the POWER button to vent the chamber. Remove your sample.
- Clean the glass jar carefully with methanol and Kim wipes, being careful not to remove the rubber seals.
- Make appropriate entry in the SEM logbook.
Characteristics of Different Coatings
Gold
Pros:
- High electrical conductivity = less coating
- Advantageous for samples used in SIMS
Cons:
- Coating is not uniform, tends to form islands
- Gives poor results in elemental analysis and backscattering
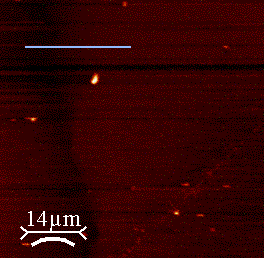
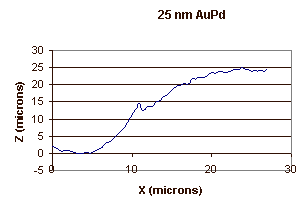
Gold Palladium
Pros:
- More uniform coating than pure gold
- Good imaging
Cons:
- Low density
- Gives poor results in elemental analysis and backscattering
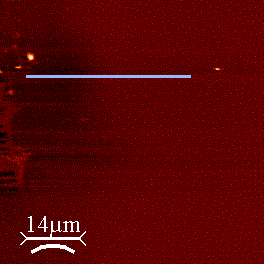
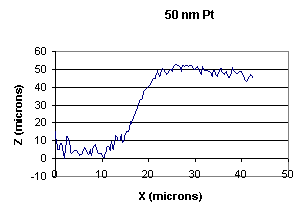
Platinum
Pros:
- High density
- More stable element than Au and AuPd
Cons:
- Very costly to replace ring
- Gives poor results in elemental analysis and backscattering
Carbon
Pros:
- Gives most accurate elemental analysis results
- Low density = Good coating for mapping and backscatter
Cons:
- No accurate method for determining thickness of coating
- Very low electrical conductivity = not as crisp of image
Tips
- A typical sample requires ~10-20nm of coating
- Delicate biological samples (thin biofilms) are best seen using ~5-7nm of coating
- Carbon coating gives the most accurate elemental analysis results
- Any surface with an electrical conductivity greater than silicon (0.012/mohm-cm) does not require coating
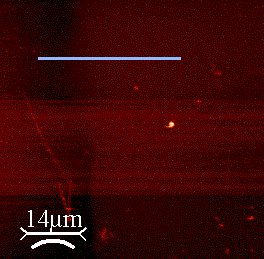
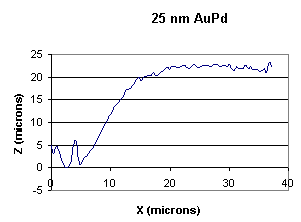
Step Analysis Using AFM